
Franklin Square is “bounded by K Street NW to the north, 13th Street NW on the east, I Street NW on the south, and 14th Street NW on the west.”
Holy moly the Franklin Park Renovation is wild if you haven’t seen it in a while. Some more photos including the Cafe Pavilion building coming along nicely: Read More

Photo by PoPville flickr user Phil
“Dear PoPville,
I have a freestanding house in DC and a few years ago we “finished” off the basement. I say “finished” because all the contractors we talked to said the ceiling was too low (69″ instead of 74″ if I remember right) for it to be living space, it had to be classified as storage. We put in lights, outlets, drywall, replaced the windows and redid the floor, which were all allowed, inspected, and approved.
The thing is, what we wanted most was a small bathroom down there, but we were told the ceiling was too low. I’ve seen many other similar houses with bathrooms and even kitchenettes in the basement, but those were all grandfathered in before the current codes. The contractor we went with advised to do everything else above the board first, then try to do the bathroom on its own later. That way if we were caught doing unpermitted work, we would only be out the time and money spent on the bathroom. So now a few years have passed, and I’m thinking of trying to sneak in a small bathroom, just a toilet, pedestal sink, and shower stall, definitely nothing fancy.
So two questions: Read More
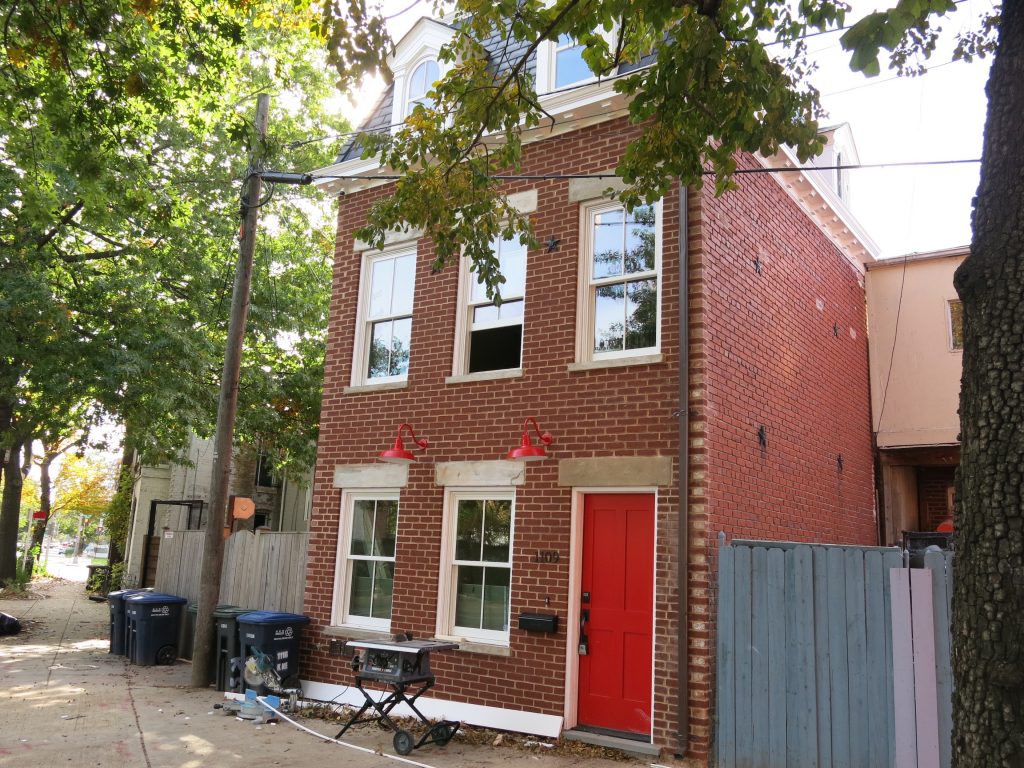
From Florida Ave, NE near Galludet.


Here’s what it looked like in 2012:
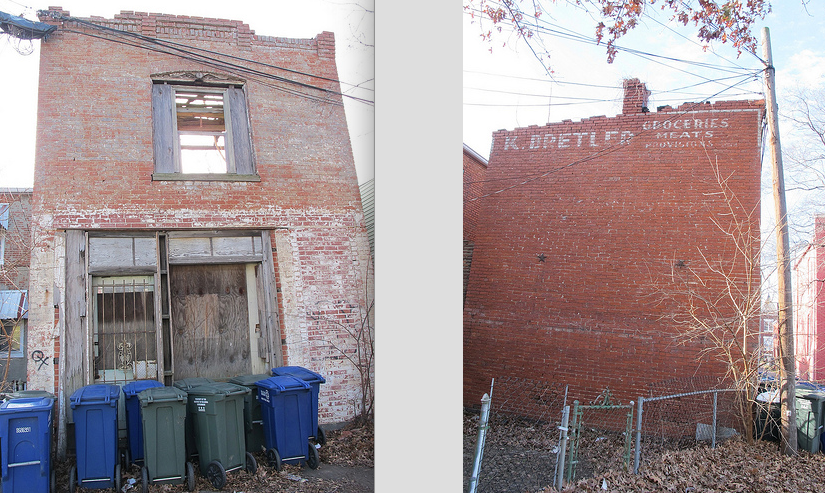

From the mustache house:
“We are all looking to maintain the facade we just don’t know of anyone who does the work. Could you help us out?”

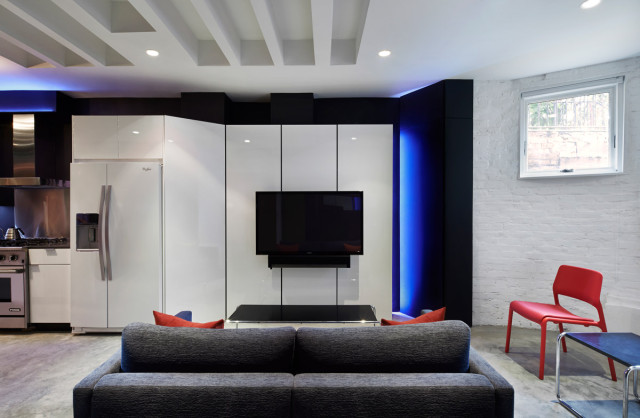
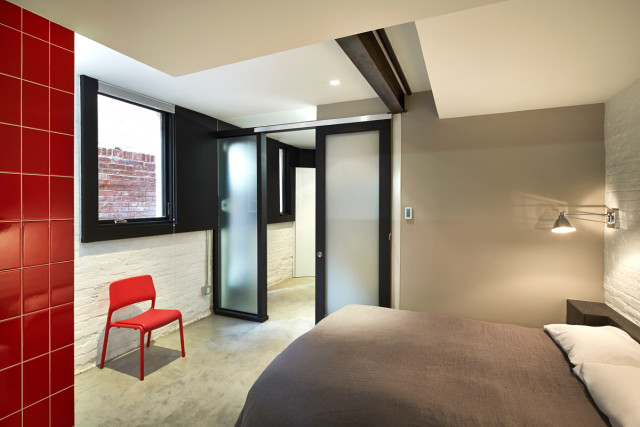
All photos by Greg Powers (Greg Powers Photography) courtesy of KUBE
Thanks to a reader for sending this awesome update:
“You hooked me up a few years back when I was considering doing a basement renovation.
The project has since completed and I’ve been happily living in it for over a year.
The design was done by the excellent team of Rich Loosle and Andrew Baldwin of Kube Architecture.
After at least 6 months of permitting delays, we finally broke ground on the dig. The first contractor had a lot of issues, so I replaced them after the dig out was completed. Start to finish it took nearly 2.5 years, but I’m very happy with the final outcome.
It was because of PoPville that I found the right team!”


Ed. Note: Critiquing the renovations is not the point of these posts. It’s simply to show what some folks have done. If you like it, obviously, feel free to let them know but again – well let me be clear – don’t be a jerk. Thanks. Sorry to have to preface with that. I really do love these features. These renovations can be extensive – like a whole house gut or simply a 1/2 bath added, floor refinished or even smaller. It can be a whole series of posts or just one. If you’d like to share one of your projects please email princeofpetworth(at)gmail thanks and thanks for understanding!
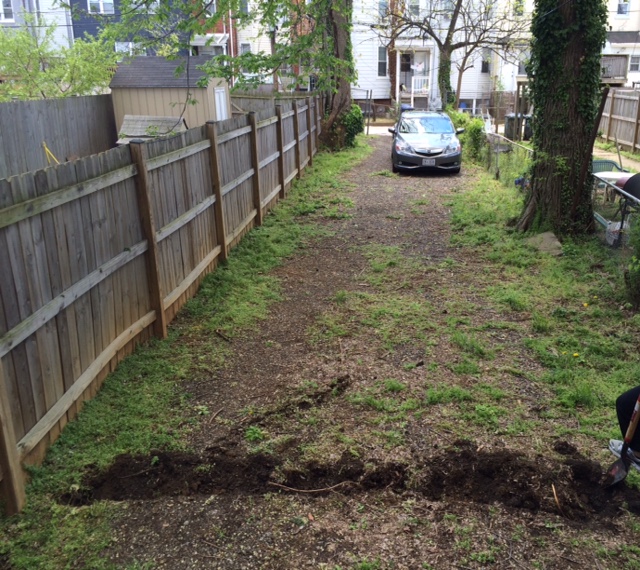
before
We have a big backyard and decided we wanted a patio, which was convenient since we recently joined the RiverSmart Homes program and they do pervious paver patios. However, after getting about five quotes (most were around $2100) we were still going to pay about $900-$1500 out of pocket depending on which company we used. My fiancée priced it out and said she could do it for around $500. We both realized it was a lot of work, but as far as DIY goes this was one of the easier things to do. It was just going to take a lot of labor and time. We went to Home Depot to start gathering materials one weekend, but turns out Harry Homeowner was also building a patio and pretty much had all the paver sand in his cart along with a million bricks! After picking up some of the bricks and sand we realized it was going to be really difficult to get the materials in our car and then from the car to the backyard. We went home and looked online, but of course Home Depot said we could only purchase it in the store. However, Lowe’s would deliver the materials for $85!
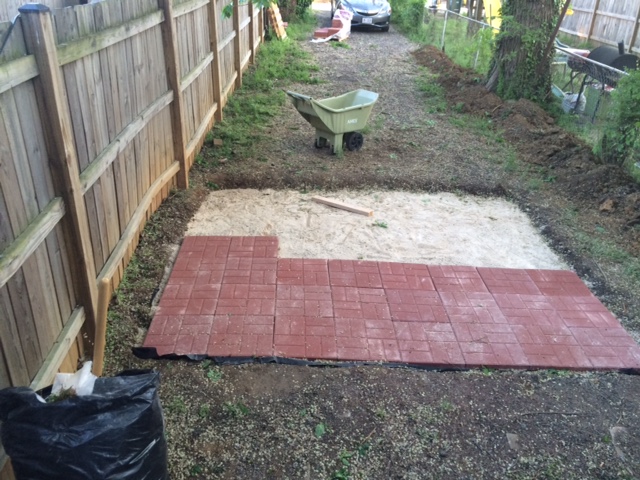
middle
Lowe’s messed up the delivery time and wouldn’t pick up the phone. They actually delivered it about five hours late and ended up waiving the $85 fee! Full disclosure: I went to New York City and my fiancée did all the digging, laid the weed barrier, gravel, and sand. She even did the first row of pavers. I got home that Sunday and began laying pavers and realized this was not easy at all! It was so tedious, and quite a work out as the pavers were toward the back of the yard so we would gather four to five pavers and then bring them up to the patio in a wheelbarrow. Then came carrying it from there to the patio. And when the sand wasn’t perfectly level and smooth the paver was wobbly! I gave up after a few pavers, but then on Monday, Tuesday, and Wednesday I laid pavers after work. The most frustrating part was when I couldn’t get a paver level and kept having to pick it up, smooth and move the sand with the 2×4, and place the paver back only to find out it still wasn’t level. I think I picked up and put back one paver twenty times.
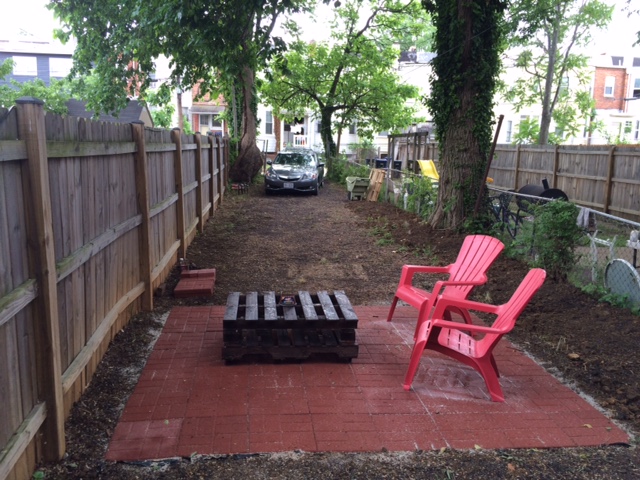
finished
We finished it off the next weekend though and then filled the gaps with paver sand. We also bought two chairs for it and made an outdoor coffee table on wheels out of the leftover pallets from Lowe’s! (Side note: If you’re going to make something out of pallets make sure the ones you use are not stamped with “MB” and that it has a legit stamp. Many pallets in general are treated with gross chemicals! You can google and read more on it.) Lastly, we put some solar lights around the two sides of the patio. We also bought and attempted to hang some edison bulb string lights, but that didn’t go so well! I am going to order some new ones online and hopefully try that again. In the end the patio cost us $485, which includes the gravel, sand, weed barrier, and pavers! I also have a much bigger appreciation for people that do landscape work for a living.
Ed. Note: We used to feature these renovations from PoPville back in the day but it’s been a while since I’ve found folks willing to share. A good time for me to say, which I sadly realize I have to say, if you have negative comments about the reno please consider keeping it to yourself. Critiquing the renovations is not the point of these posts. It’s simply to show what some folks have done. If you like it, obviously, feel free to let them know but again – well let me be clear – don’t be a jerk. Thanks. Sorry to have to preface with that. I really do love these features and am fortunate that 2 or 3 three more folks have also agreed to share their renovations. These renovations can be extensive – like a whole house gut or simply a 1/2 bath added, floor refinished or even smaller. It can be a whole series of posts or just one. If you’d like to share one of your projects please email princeofpetworth(at)gmail thanks and thanks for understanding!
You can read episode three from this series here.
It’s funny because I read and hear a lot of comments from people saying they wouldn’t purchase a house if it didn’t have central air. However, if you take a walk around DC many homes do not have central air and you’ll notice lots of window units! I did a little research before we even purchased and discovered installing central air was a significant purchase, but it wasn’t too bad. I think it’s a good investment efficiency wise and obviously for resale since so many people apparently expect central air. I’ve never lived with window units and I heard mixed reviews on how well they work. However, I did live without air conditioning during the first year of college and that wasn’t pleasant for a few months out of the year! So we started getting quotes shortly after we moved in, which felt kind of odd since it was already October at that point and air conditioning was definitely not needed.
Getting central air quotes was a much better experience than getting window quotes! Some companies wouldn’t even consider installing central air as they only did replacements for whatever reason. Polar Bear Air Conditioning & Heating said they would give us a 20 percent discount if we installed central air by the end of February because that’s usually a slow time of year and not many people are thinking about getting air conditioning work done. After reading more of their reviews and even a few comments on PoPville, we finally decided to go with Polar Bear in January and planned to start the work end of February.
The job was supposed to take about four days and it did, but that was spread out over about a week and a half due to the snow storms and ridiculously cold temperatures. They finished cutting the holes and installing the ducts and vents pretty quickly. They installed the ducts in our closets, which is good and bad. We lost some closet space, but at least they’re hidden away. And the one in the office is actually exposed because we removed that closet awhile ago. Then it was time for the roof work and it was about five degrees outside so that was out of the question. Luckily, they finished by the end of February and we now have central air! It cost $13,600 to have central air installed in the house. Polar Bear recommended a contractor to box in the duct work for us as well. They also repaired a badly damaged door frame in the office room and it looks like new again! I am very happy with the boxed in duct work and I know I will appreciate the central air this summer.
Ed. Note: We used to feature these renovations from PoPville back in the day but it’s been a while since I’ve found folks willing to share. A good time for me to say, which I sadly realize I have to say, if you have negative comments about the reno please consider keeping it to yourself. Critiquing the renovations is not the point of these posts. It’s simply to show what some folks have done. If you like it, obviously, feel free to let them know but again – well let me be clear – don’t be a jerk. Thanks. Sorry to have to preface with that. I really do love these features and am fortunate that 2 or 3 three more folks have also agreed to share their renovations. These renovations can be extensive – like a whole house gut or simply a 1/2 bath added, floor refinished or even smaller. It can be a whole series of posts or just one. If you’d like to share one of your projects please email princeofpetworth(at)gmail thanks and thanks for understanding!
You can read episode two from this series here.
“I knew we would replace the windows in our house eventually, but I did not think we would do it in the first year let alone the first five months! However, after doing some research I found it was more cost effective to do all 15 windows at once rather than replace a few at time. Plus many companies have a four (or more) window minimum. I hope no one reading this has to replace windows soon because the initial consultation some of these window companies make you suffer through are terrible. Also, both spouses have to be home for the consultation, which is really annoying if you both work. Our windows were twenty years old and I don’t think they were even nice windows the day they were installed. They were so drafty and some of them could not even be unlocked, or it felt like they would break if you forced it! One window also had a small break in the glass.
First we met with Home Depot for a quick estimate on getting one window fixed since the lock on it was broken and that is not too safe. He was prompt and provided us with a quote for $671 Simonton window. He never mentioned lead paint or any of that and I know our house has lead paint in it since it’s 100+ years old. If you’re dealing with lead paint there is a special process for removing/disposing of the old windows. I also read mixed reviews on buying windows from Home Depot. Furthermore, $671 for a window and installation isn’t that cheap. Read More
Ed. Note: If you have negative comments about the reno please consider keeping it to yourself. Critiquing the renovations is not the point of these posts. It’s simply to show what some folks have done. If you like it, obviously, feel free to let them know but again – well let me be clear – don’t be a jerk. Thanks.
These renovations can be extensive – like a whole house gut or simply a 1/2 bath added, floor refinished or even smaller. It can be a whole series of posts or just one. If you’d like to share one of your projects please email princeofpetworth(at)gmail thanks and thanks for understanding!
before
Thanks to a reader for sharing:
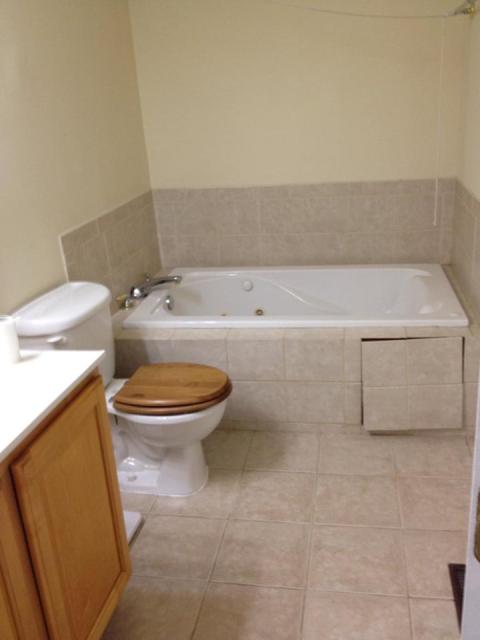
“I didn’t want anything particularly high end. I was fine keeping the builder-grade vanity; it was functional and in reasonable shape and easy enough to replace later if I changed my mind. (I did replace the top, which was mottled with makeup stains, but I went about as cheap as I could go.) The misfit wooden toilet seat was, okay, odd, but I figured it was also something I could replace later, without the help of a contractor. (A year later I still haven’t bothered.) I did replace all the fixtures, because I was going to have to get new fixtures for the tub and I wanted them all to match, but mostly I focused my attention on picking out a tub that would be comfortable for bathing in while still working well as a shower and on finding tile that met my need for color. (That part was surprisingly difficult. Beige is very popular.)
I talked with three potential contractors about the project. One suggested adding a light fixture over the bathtub (previously the only fixture was the one over the vanity), and one suggested that the reduced footprint of the new tub meant there would be room to add inset shelves. I thought those were good ideas, so I took them, then went with the third contractor.
That contractor was not great. (I will not be sharing their name.) They were friendly and responsive, which is good, because for several weeks my nightly routine was to come home, inspect their progress, and write a detailed e-mail about what they’d done wrong and would need to rip out and redo. But eventually the cement board was correctly hung, the tile was correctly laid, the fixtures were hung level and in the correct places, the hot and cold water were connected in the correct order, the water damage was repaired, and I was at long last able to take a shower in my own bathroom.
I’m planning on staying put for a long time to come, so I wasn’t concerned about resale value. I just wanted something that would look pleasing to me, and despite the bumps along the way I’m pretty satisfied with the end result. Total cost including materials was around $8,500.”
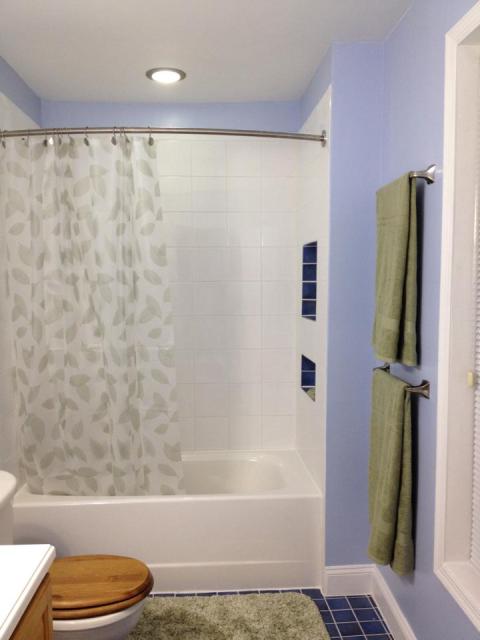
[New bathroom. The blue tile visible on the shower wall is the interior edging of the inset shelves. The backs of the shelves are white tile.]
More photos after the jump. Read More
Ed. Note: We used to feature these renovations from PoPville back in the day but it’s been a while since I’ve found folks willing to share. A good time for me to say, which I sadly realize I have to say, if you have negative comments about the reno please consider keeping it to yourself. Critiquing the renovations is not the point of these posts. It’s simply to show what some folks have done. If you like it, obviously, feel free to let them know but again – well let me be clear – don’t be a jerk. Thanks. Sorry to have to preface with that. I really do love these features and am fortunate that 2 or 3 three more folks have also agreed to share their renovations. These renovations can be extensive – like a whole house gut or simply a 1/2 bath added, floor refinished or even smaller. It can be a whole series of posts or just one. If you’d like to share one of your projects please email princeofpetworth(at)gmail thanks and thanks for understanding!
You can read episode one from this series here.
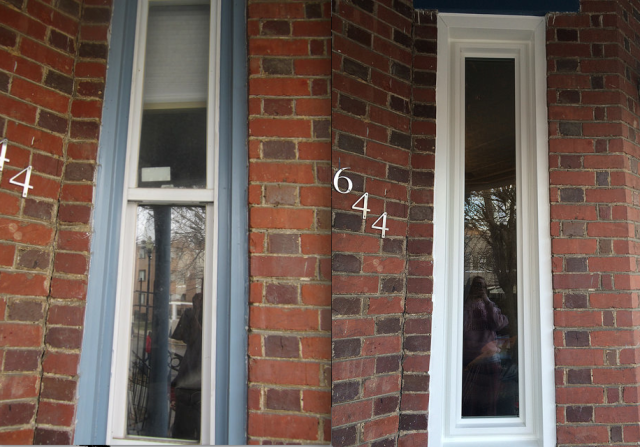
We did a lot of little things in the house as soon as we moved in. Obviously it’s wise to change the locks, which we did after settlement. The door knobs and locks on it were pretty worn though so it was a nice aesthetic change as well. The house address was also a junky piece of wood with paint chipping and the numbers were not pretty either. That was any easy update because we just bought the numbers at Home Depot and removed the piece of wood from the house. It was somewhat difficult to mount the numbers against the brick, but I just aligned them so I could screw it in to the mortar.
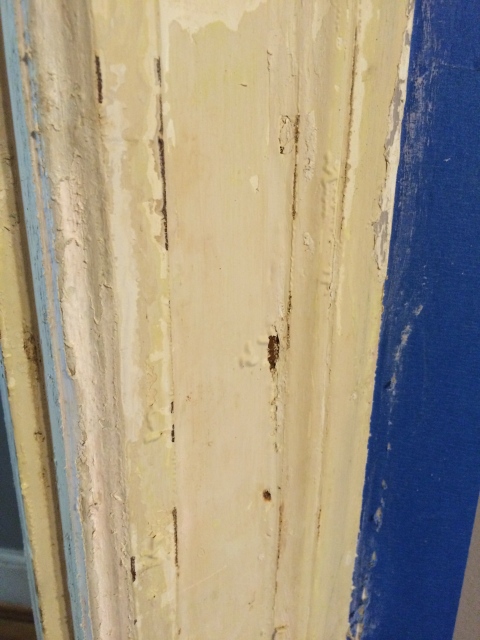
One thing we thought that we would do was strip the paint on some of the doors and frames. Well, my partner started stripping one of the entryways and it was a lot more difficult than she imagined. We decided we would only do that one since it was a very time-consuming. There were multiple layers of paint and we wanted to even it out as much as we could, but we could have worked on it all year.
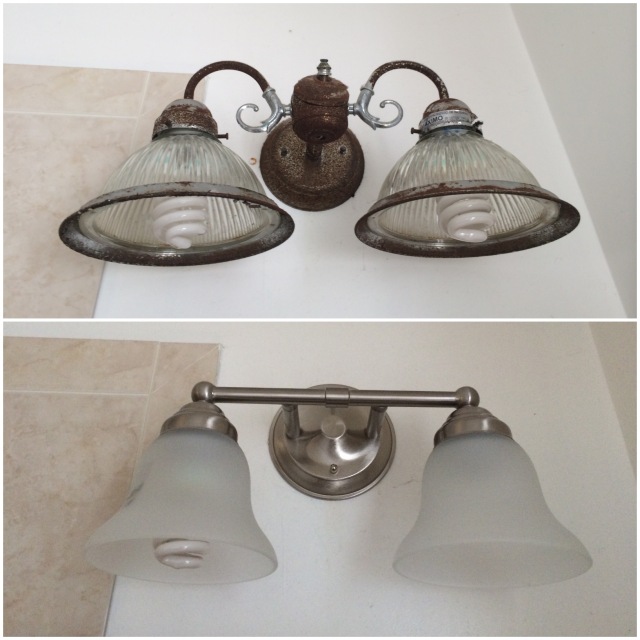
The bathroom light fixture was horrendous. Well, the whole bathroom is horrendous, but a light fixture is a lot easier, and cheaper to fix. Again we bought a simple light fixture at Home Depot and my partner installed it. I cannot do electrical so I am glad she can! The foyer had an old, flat light that looked kind of gross inside. We ordered a little chandelier on Wayfair.com. Now that was a lot more difficult to install, but it was worth it in the end!
before
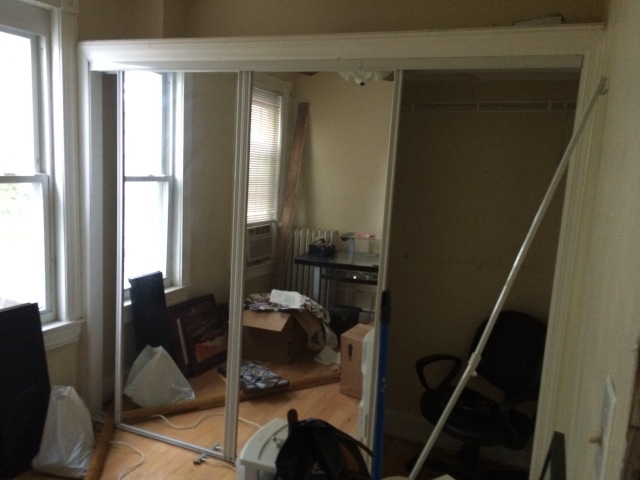
Lastly, we removed all the closet doors and in some cases the closet completely. The closet in the master bedroom had those sliding doors and I hate those because they always come off the tracks! My partner removed those and we actually used one of the closet doors to make a coat rack for the foyer. Anyhow, then we bought closet organizers from Home Depot (yes we spend a lot of time and money there). We installed that one evening and it wasn’t too difficult. We will put doors back on the closet eventually, but I just try to keep my closet organized for now! There were also mirror closets in the back room of the house and the room in the basement. We removed the doors and shelves in the back office so right now it’s just a nook. Not sure if we’re going to keep it like that or what because we haven’t finished that room. My partner removed the closet in the basement, but kept the shelves because we turned that room into a home gym. If anyone is interested in doing that we bought some weights, bar, and bench on Craigslist for about $75! All these little updates are much more affordable than many of our other projects, but they make a difference.
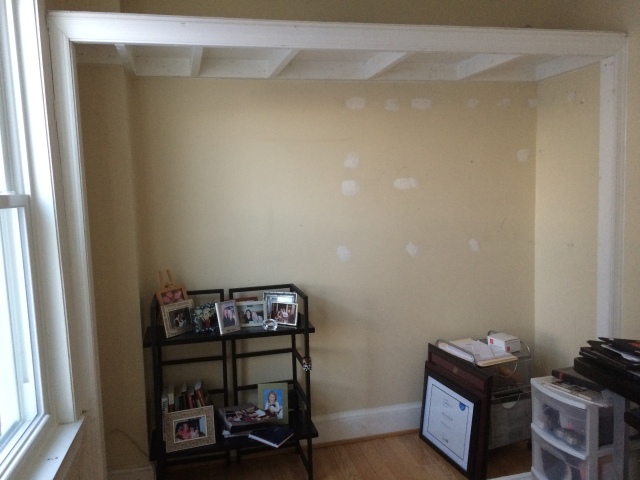
after